On reflection, I think that the pre-production process has been extremely helpful and, from what we have learned from it, I am confident that we are in a good place now that we are approaching the main shoot. We became aware of a number of problems with our initial idea that we would not have spotted had we not performed our test shoot, and have since come up with many ways of working around them. We were also able to find out which of our shots and other ideas worked really well and now know what we will keep in our main shoot.
We have worked very well as a group and have each contributed much to this project, putting in a lot of our own time outside of scheduled 'shooting time' into making sure that we are prepared as we can be for the main shoot and it will look as good as possible.
Here is the outside panel of my digipak album cover.
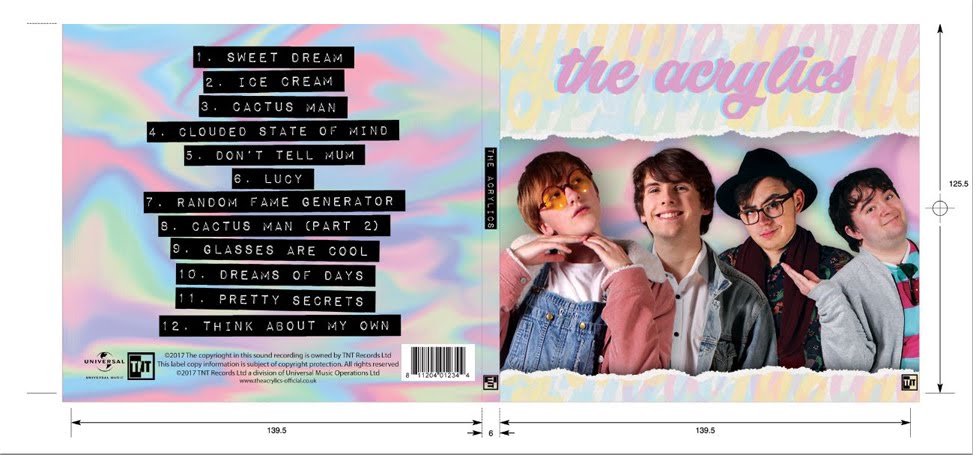
Here is the inside panel of my digipak album cover.

Here is a link to my artist's website. Please click on the image below to enter the website.

Showing posts with label AS Research and Planning. Show all posts
Showing posts with label AS Research and Planning. Show all posts
Monday, 6 February 2017

R+P Post 19: Our rough cut
We found that some of our ideas worked really well once we'd finished our rough cut. The pace in the middle of the opening was quick and that made the intercuts between the characters interesting and dynamic.
We also liked how the music complimented the scene, particularly when our idea to have the music turn from non-diegetic to diegetic worked successfully. This happens when the character Raj is shown to be playing music through his earphones, and when this is shown, we cut the music from a downloaded 'clean' track to one that we had recorded earlier through a microphone that had a tinny quality to it. This effectively made it seem as if the music was now coming from Raj's headphones and not just a part of the soundtrack.
Our group, with the help of feedback from our teachers, also agreed on a few changes that we could make. Because we couldn't achieve the arc we wanted when we were filming, we had to try and edit the tilt we had filmed to the best of our ability. However, the cut felt like a jump cut and the change of characters at that moment was not as effective as it could've been. We agreed that the speed at which the camera panned from the detective to the teenagers at that point could be increased to achieve a more dynamic effect. We also thought we could add a shot-reverse shot somewhere in this sequence to make the pan less tiresome.
We also agreed on a few other points:
- cut to more reaction shots (e.g. when the detective passes over the clipboard, add a shot of the detective's face)
- cut quicker on some shots (e.g. when Cherish says 'Please')
R+P Post 18: Our test shoot
Our group definitely wanted to do a test shoot before we did a main shoot for our film opening, because we decided that if any problems with what we had planned, the test shoot would reveal them, giving us time to improve upon our final idea before we did our main shoot.
Our media teacher suggested that we could shoot the whole of each conversation between the detective and the teens in a master shot. We decided that this would be a good idea, because it would mean that if a certain shot did not turn out as planned, we would have the master shot as a backup. It also allowed the actors to rehearse their lines and get a grasp of their characters and their situation in the scene.


We received feedback from our group discussions and from our teachers, and have decided upon a list of things to improve for our main shoot:
In preparation for the test shoot, we created a shoot board. We were provided with a template in which we could complete the shoot board, and we decided that it would be beneficial for us to use it. The template broke down each shot into the time, the shot number, the date and location, the action and dialogue, the actors involved and the roles of the crew, also including columns for the number of takes and the best take (to be filled in on the test shoot day). We found this template would be very useful because it condensed several documents worth of information on one easy to follow table.
We decided to split the workload between us to create the shoot board, each of us taking about four pages each. It was decided that we would organise the shoot board based on character; because there are a lot of characters being interrogated during our opening, we thought that going through the shots character by character would help save time, what with the character's never leaving their position at the table, rather than switch out characters and doing it purely by the camera set up. Also, because we had four external actors outside of our media group, we decided to put their scenes first so that they didn't have to wait as long to leave.
 |
| Page 3 of our Test Shoot Board |
Once we'd decided on the order we wanted to film the shots, it was simply then a matter of filling in the rest of the table. For the action/dialogue column, we decided it would be better to have visual evidence, so we took photos of the shots from our storyboard to provide an image of the shot we wanted. This benefited us because having a large number of characters meant that we had a number of actors outside of our media group who weren't as familiar with the action of our film opening, and it was easier for them to see what they needed to do rather than read it.


We also made sure that we organised who was on camera or directing for each shot. This was useful for two reasons: for one, it meant that we saved time exchanging roles on the shoot day, and secondly, it meant we shared out the workload of being on camera etc. For instance, I managed to get a good chance filming by being scheduled to shoot a lot of the close ups, as my role in the opening meant I was rarely not acting.

Me on camera duty
The test shoot went well and we had a lot of good things come from it. The actors got to grips with their characters very well and even though we have decided to change round some of the actor's roles to fit their characters better, everyone involved now has a good idea of the story. The lighting was good for the most part, save for one shot which required a bit more light exposure.

The test shoot helped us discover what needed improving for the main shoot. We discovered a few flaws with our shoot board; we discovered that a lot of time could be saved by rearranging the order that we took shots if there was the same camera set up. For instance, the quick cuts between Tyrone, Lucy and Raj in the latter half of our opening could have been filmed consecutively, as it would look better to keep the camera in the same set up for these shots.
As we had scheduled for these shots to be done at different times, the set ups do not look consistent, predominantly in light exposure
Also, we discovered that some of the equipment we hired for the shoot did not work as we would've hoped. We received a dolly so that we could make smooth pans and arcs, but unfortunately, the floor of the garage where we were filming was too bumpy to make the pan smooth - the wheels snagged sometimes and made a loud noise as it rolled across the floor, which distracted from the dialogue of the scene.
This was one shot where we planned to use the dolly. As you can see, the camera is very shaky and this was because to reduce the noise created by the dolly, we had to lift the camera a little, which gave it a very handheld look.
We have decided on an alternative to our arc for the main shoot, where we will try and use a pan instead with the camera grounded by a tripod.
Although this was largely improvisation, this is the new idea we had instead of using the revolve we had initially wanted using the dolly.
We received feedback from our group discussions and from our teachers, and have decided upon a list of things to improve for our main shoot:
- Switch the actors who play Cherish and Lucy
- Alter script so that Cherish has more screen time
- Fix the jump cut on the tilt when Tyrone changes with Simon with grading and closer editing to make it less noticeable
- Alter script to have more detective jargon (e.g. "murder
caseinquiry") - Make the detective more energetic, as if he is ready to start the case - frustrated, eager rather than bored, tired. Reflect this in his costume; give him a blazer and make him smarter by not rolling up his sleeves.
- Shorten Screen Gems indent
- Have music playing over studio indents
- Add lighting on foot shot
- Give the audio recorder more of a function in the scene
- Improve the quality of the zoom in on the detective at the end
On the test shoot day, we worked efficiently to finish filming by the wrap time we had arranged for ourselves, and we ended up wrapping up on time at 4:30. All in all, I think we worked well together and managed to produce a decent product. Although our product is a lot longer than the two minutes stated in the brief, we are not going to cut anything for now, as we think it's better to go into the main shoot with too much footage rather than too little.
R+P Post 17: Our editing arrangements
As a group, we decided that a schedule would benefit our group when it came to editing our test shoot footage, because it when we used an editing schedule for our animatic, we were successful in organising our time efficiently so that we finished before the deadline.
Some of our editing time was as a group, whereas other times it was individually or in a pair. To keep each other updated of our progress when someone was absent, we would leave a note by our edit suite denoting what progress or changes we had made. This meant we could stay well co-ordinated and not make any changes that hadn't been recognised and agreed by the group as a whole.
 |
| Our editing schedule for the rough cut. |
R+P Post 16: Casting, costumes, hair and make-up
Because our characters are almost all young, college age students, we agreed that the best people to cast would be people from our peer group. We would need a total of 7 actors, so to prevent having too many people give up their free time to come to our shoot days, each member of our group decided to take an acting role, therefore keeping the number of actors other than us to a minimum. We kept diversity in mind when casting, as we wanted to represent many different identities from the teenage social group. Therefore, we cast people of a variety of different ethnicities and gender identities.
Here was the original cast:
'Raj Singh' - Shathushan Somasundaram
'DC Sean Mann' - Jack Edmondson
'Cherish Beauguarde' - Tiwa Antwi
'Lucy Patterson' - Mari Hamano
'Tyrone Beckham' - Sayo Ajoje
'Simon Smith' - Emilio Francischelli
'Officer' - Ekincan Kaya
'DC Sean Mann' - Jack Edmondson
'Cherish Beauguarde' - Tiwa Antwi
'Lucy Patterson' - Mari Hamano
'Tyrone Beckham' - Sayo Ajoje
'Simon Smith' - Emilio Francischelli
'Officer' - Ekincan Kaya
Here was the casting, costume, and hair and makeup document we made in advance of the test shoot. We created this document so we could inform our actors what costume to bring and how we wanted their hair and makeup to look. Please note that this document has been updated to show the finished look of our characters from the main shoot with the changes we made since the test shoot, including our swapping round of actors for Cherish and Lucy.


R+P Post 15: Our filming location, set design and props
One of our first decisions as a group after we decided on our plot was where it would be filmed. It was important to find a filming location that replicated the interrogation room appearance that has been seen throughout movies and television.

Our filming location had to be a small bare room, in which we could darken the lights to create an intense atmosphere for our actors. After discussion, Emilio offered his home's garage as a possible place to film and, after we all saw photos of the garage space, we agreed that it was a suitable location for us to film an interrogation scene.

We then decided to stage a recce, giving us a chance to view and dress the filming location in advance of the test shoot, and bring any props or set pieces to the filming location. Our group organised to do this on the Saturday before the weekend of our test shoot. I contributed a white table, which we agreed befitted the appearance of a clinical police station's interrogation room, and we were also lent a number of props from our media teacher, who gave us two grey, plastic chairs, a clock and an audio recorder, which we agreed would make the interviews more professional. Most notably, our media teacher lent us a lightbulb which we could suspend from the ceiling, which was another interrogation trope we decided would fit our opening very well.
Once all the set pieces and props were transported to our filming location, we dressed the set. We pushed the table against the wall, which was made of grey bricks, and suspended the lightbulb over the table. This meant that when the overhead lights were taken down, the lightbulb illuminated the set in an intense glow, which we all agreed made for a well achieved atmosphere.

The props we used included:


Our filming location: BEFORE
We then decided to stage a recce, giving us a chance to view and dress the filming location in advance of the test shoot, and bring any props or set pieces to the filming location. Our group organised to do this on the Saturday before the weekend of our test shoot. I contributed a white table, which we agreed befitted the appearance of a clinical police station's interrogation room, and we were also lent a number of props from our media teacher, who gave us two grey, plastic chairs, a clock and an audio recorder, which we agreed would make the interviews more professional. Most notably, our media teacher lent us a lightbulb which we could suspend from the ceiling, which was another interrogation trope we decided would fit our opening very well.
Once all the set pieces and props were transported to our filming location, we dressed the set. We pushed the table against the wall, which was made of grey bricks, and suspended the lightbulb over the table. This meant that when the overhead lights were taken down, the lightbulb illuminated the set in an intense glow, which we all agreed made for a well achieved atmosphere.

Our filming location: AFTER
The props we used included:
- A clipboard and a file - we created a profile of Peter Smith, the missing teenager, and attached a head shot of him to the top of the file; we took a photo of our fellow media student Tom Brown to create the head shot.

- A clock - we planned to have specific times for each of the characters, so for each of the interviews the clock will be at a different time. This signifies the non-linear narrative; the interviews are happening at different times. Lucy's interview is first as she is the first one to hear about Peter's murder.

- An audio recorder - a device that is a common piece of iconography for the interrogation room setting, as well as the mystery genre

- A packet of tissues, for Lucy and Cherish.
- A phone and earphones, for Raj.

Overall, the set we created successfully replicated the look of a police interrogation room and was ready for our test shoot.
R+P Post 14: Our filming arrangements
Our group did several things in order to be prepared for the shoot days.
First, we scheduled the dates when we would have our test, main and backup shoots, so that when we casted our actors, we could ensure they would be free for all three weekend shoots. We decided this fairly early on during pre-production, around the time of completing the storyboard.

A week before our test shoot, we agreed to bring all of the kit to our location so that we could stage our set well in advance and not waste time on the morning of the shoot creating the set. Emilio brought the kit home from school on the Friday evening, and on Saturday we brought other necessities, such as the white table, over to the location ready for filming.
We then filled out a shoot organisation form, which described all the arrangements for the test shoot. This included the call times for our group and the actors, the location where we will be filming, the time we would be wrapping up filming, the names of all the additional actors and the signing off of any further kit arrangements.

A message I sent to my friend Mari, who played Lucy in our film opening
A week before our test shoot, we agreed to bring all of the kit to our location so that we could stage our set well in advance and not waste time on the morning of the shoot creating the set. Emilio brought the kit home from school on the Friday evening, and on Saturday we brought other necessities, such as the white table, over to the location ready for filming.
We then filled out a shoot organisation form, which described all the arrangements for the test shoot. This included the call times for our group and the actors, the location where we will be filming, the time we would be wrapping up filming, the names of all the additional actors and the signing off of any further kit arrangements.
 |
| Our test shoot organisation form |
R+P Post 13: Our Animatic
It was decided in our group to create an animatic before we did our test shoot. After seeing an example of what an animatic looked like from last year's Year 12 students, we decided that we would benefit from creating our own, because we felt that it would help to lift the shots from our storyboard, and translate it into shots in real life, which gives us the first impression of how our film opening will play out and if it works well together with the music, titles and dialogue.
We started by taking photographs in our classroom, using the three members of our group to pose as the different characters and act out in still what they were doing in the shot. Because our opening contains a total of seven characters, Emilio and Sayo multi-roled as the teenagers being questioned, using props and items of clothing to set the different characters apart. In order to keep the animatic coherent, I played just the role of the detective, as in our opening, he is the only character that remains continuous throughout, and it would be confusing to change that during the animatic. We also asked Noa Craig from the other media group to act out the role of the officer, as in these shots three people are in frame, and we needed the third member of our group (Sayo) to be behind the camera to take the shots.
Next, we recorded voice overs of the dialogue using the first draft of our script. We then had a week to edit. We distributed the work of editing by making an edit schedule:
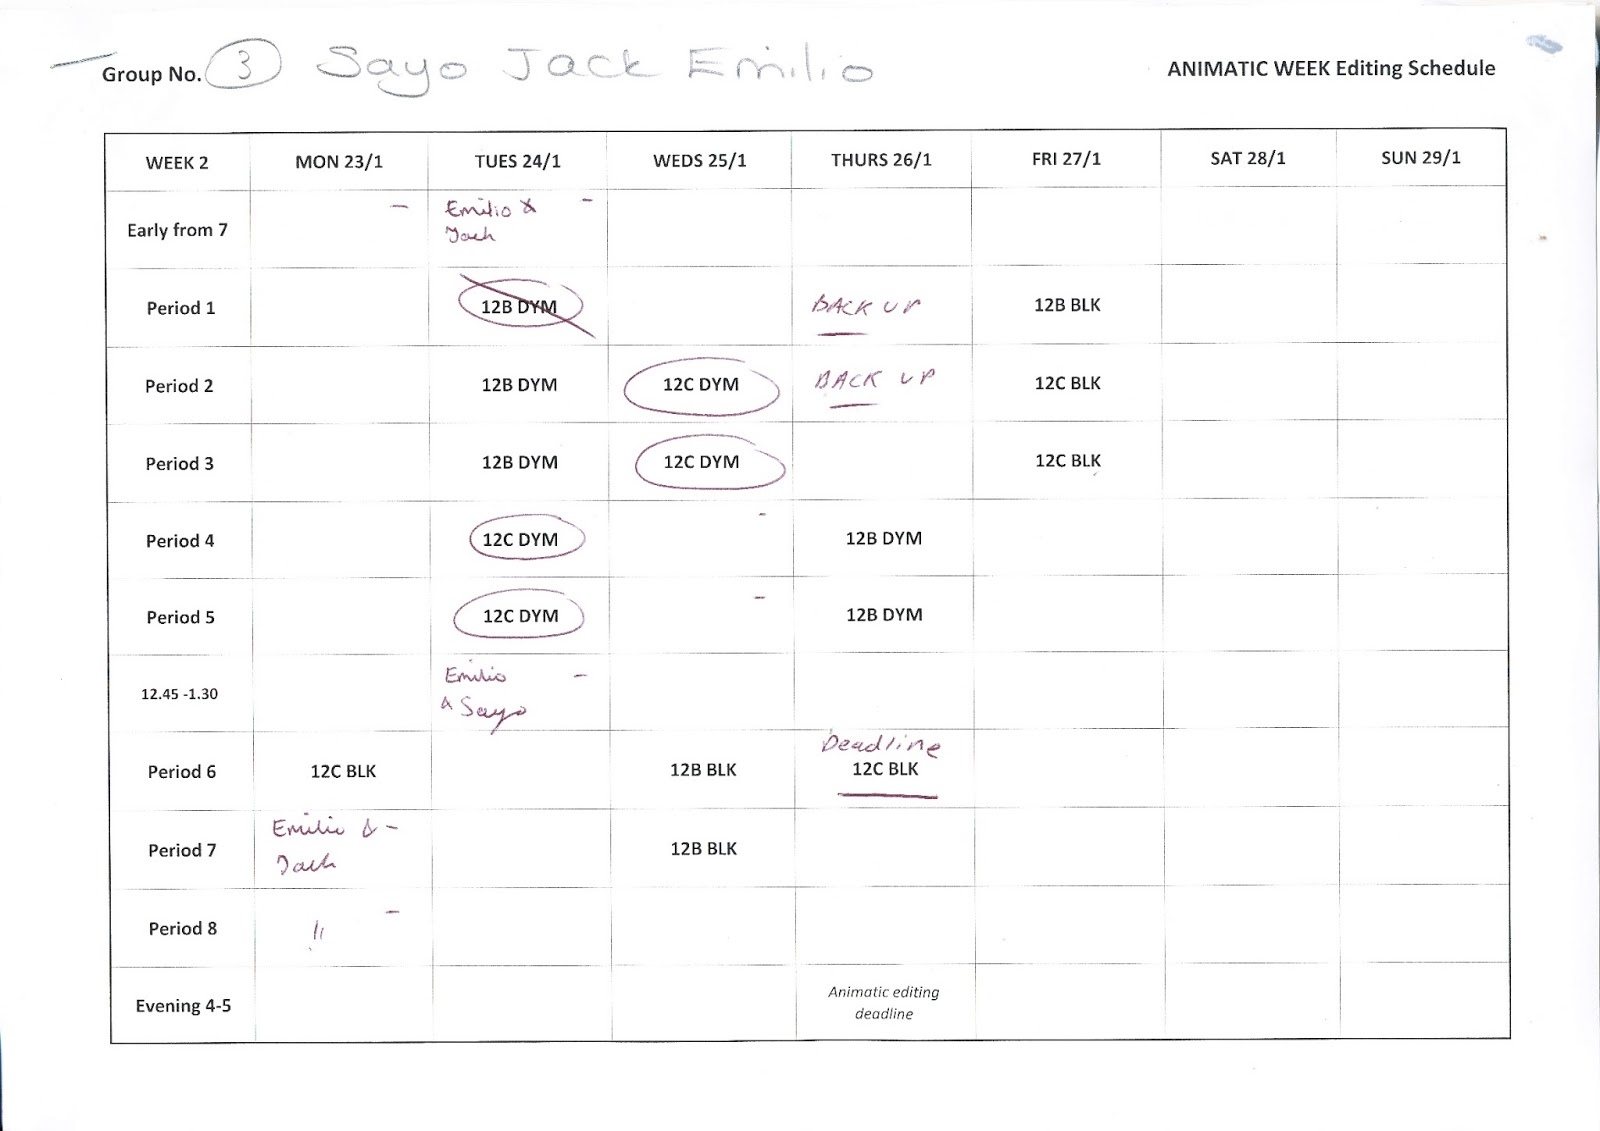 |
| Our animatic schedule |
During editing, we placed our shots in order according to our storyboard, then added in the recorded dialogue to play over the corresponding shots, as well as the beginnings and endings of our music tracks. We also added in thick white arrows over the shots to indicate the camera's movements, as we couldn't synthesise the movement of the camera with static images.
Here is our completed animatic:
The animatic was helpful in some regards. Watching the opening of our film from start to finish gave us a new perspective in which to make improvements; one of the improvements that came up from completing the animatic was that we needed to add more lines to the script and mise-en-scene that are indicative of the crime/drama genre. For instance, we added in lines such as 'It's time to call your lawyer' and decided that we could use a clock and a dictaphone to improve the look of the interrogation room.
It was also a lot easier to get feedback from other people about our film opening by showing them the animatic, rather than having to talk through our storyboard, so it proved a useful tool to show others, as well as ourselves, what could be accomplished.
Overall, the animatic showed that our film opening ran smoothly and had a good pace to it; however, some elements couldn't be exemplified very well in the animatic, such as the zoom at the end, leaving some issues unresolved by the time of the test shoot.
R+P Post 12: Our Storyboard
Our group decided to make a storyboard during pre-production. During our preliminary task, we created some storyboards before we did our shoot. Although this task involved more than twice as much content, we found that the way in which we created our storyboard in our prelim would be very beneficial when deciding the look of our shots, allowing the ability to alter and change our ideas throughout the pre-production process, and finally having some visual representation of our film opening.
 |
| Our final storyboard - the post-its are stuck down with Blu-Tac so things can change right up until the main shoot |
Our teacher provided us with a resource on which we could put down our ideas for our storyboard, which was an A3 piece of paper which was split in similar fashion to our timeline into beginning, middle and end. We decided that this resource would benefit us because the three-part structure would help make it easier to translate the information from our timeline to our storyboard, and keep our documents consistent in their layout.
We decided to use different coloured post-it notes to represent the different shots on our storyboard.
 |
We worked through the storyboard from start to finish, sharing the work load of drawing the shots between the three of us to cut down on time.
As the key above the storyboard shows, the different colours are representative of the different shot types, and in the corner of each post-it, we wrote an abbreviation for the specific type of shot we wanted (for example, we'd have a blue post-it for a close up, then write ECU in the corner to mean 'extreme close up'). We decided to do this so that we could visualise the diversity of framing in the opening, so if a sequence of shots were all mid-shots, for example, we could spot it by their colours and consider changing some of the framing in that sequence to keep it interesting visually. This was especially important for our opening sequence; because a lot needs to be conveyed to the audience, including a lot of plot points and characters, it is easy for the audience to become bored by the constant stream of information, so it is very important to keep the look of the opening as visually striking as possible.

The use of post-its also meant nothing was permanently fixed to the storyboard, meaning we could easily change the order of shots and add new shots in when things needed changing.
The storyboard is one of our most frequently referenced documents, and is stuck to the wall by our edit suite so we can constantly refer to it, for instance, when need to see the order of our shots when we are editing. We plan to keep expanding and improve upon our storyboard by adding and subtracting shots to it as our ideas and the story evolve in preparation for the main shoot.
R+P Post 11: Our Timeline
It was a group decision to create a timeline as part of the pre-production process. Having seen the timelines that previous year groups had created, we decided that a timeline would help us condense the ideas we agreed upon in the early development of our project and place them into one physical document that we could easily refer to later on.
- Visual track - this is where we denoted our ideas for framing, camera movement, mise-en-scene, and characters, as well as when the titles and credits would come in.
- Voice track - this is where we denoted the basic idea of what we wanted our characters to say in each shot.
- Sound track - this is where we denoted our ideas for what sounds we would need to hear, such as the opening and closing of doors, and when our music would come in
 |
| On the left hand side, the contents of each horizontal section is described concisely |
We decided to use it because the way the timeline was like meant we could spread our ideas across multiple timelines for the different aspects of our film opening, thus avoiding a cluttered document. For the introduction of each new shot, music, sound or piece of dialogue, we drew a vertical line, and the end of each would be indicated by a second vertical line. As each of the three sections were already divided in two by a horizontal line, we took advantage of that in some cases, for instance to separate our ideas for sound design and soundtrack. Visually, this made for a very clear document, as we could clearly see what sound, piece of music or dialogue corresponded with it's shot as the vertical lines would match them up. It was also our first look at how we could keep each new element of the story interesting, for instance with camera techniques such as arcs and zooms.
The timeline was also split vertically into three sections: the beginning, middle and end. This is in compliance with Todorov's theory of a three part narrative structure. Because the story for our opening sequence involved introducing a large cast of characters and some establishing plot exposition in a short space of time, we found the way the timeline was organised would benefit us, as we would notice when the back-and-forth between the characters in the middle would need to be more pacy in order to hold the audience's interest, and we would also know how to spread the conveying of information to the audience so that it was evenly distributed across the three parts, so the audience wasn't confused by a sudden overload of information.

 |
| As you can see, there was a lot of information to convey in the middle and end of our timeline. The timeline's three-part structure helped us condense our ideas so that we could visualise how our narrative would developers concisely and coherently as possible. This meant our finished timeline had enough content to convey our story, but the information is delivered evenly throughout the opening so that the audience is neither overwhelmed with information, or bored by he lack of any new story development. |
The time signatures across the time line displayed ten second intervals from start to finish, which ended at two minutes. Although we decided not be too strict with how long our shots would be this early in pre-production, this did allow us to see how we could condense our ideas to fit the brief's requirement of keeping the opening to two minutes.
 |
| Our finished timeline |
Monday, 16 January 2017
R+P Post 10: Reflections so far/looking ahead
Overall, I am feeling very positive about how our film opening is going to turn out. Emilio, Sayo and I have worked very well as a group. We are very comfortable sharing our ideas and concerns with each other and have done well to keep in touch frequently on our WhatsApp group and by attending meetings twice a week. We've all contributed something to the development of this film opening, and the process itself has been enjoyable.
R+P Post 9: Our opening sequence's soundtrack
We have chosen a remix of 'The Devil in the New Dress' instrumental to play over the beginning of the opening sequence and also at the very end when the film's title appears.
We chose this music for our soundtrack because we wanted to pay homage to the typical, neo-noir soundtracks that usually include a jazz score, films like Chinatown.
'The Devil in the New Dress' has a similar smooth tone to jazz, which will set a familiar tone for people who are fans of crime dramas, only it is a new song for a modern age. It is also a remix of the song by Kanye West, a music icon amongst young adult audiences, so the music choice will not alienate our target audience.
The music will be diegetic at the beginning of the sequence as it plays over the opening credits, but when it is revealed that it is Raj playing the song through his headphones, we will switch the music to diegetic, with the sound perspective coming from behind Raj, where the camera is. Thus, we will make the song sound quieter and tinny to make the sound perspective appear realistic. Such a technique is used in The Amazing Spider-Man 2.
The music will come back in at the end as the movie's title card appears to create a sudden contrast with the silence that occurs after Peter's murder has been revealed, allowing the audience to relieve their tension and continue with the film.
We sourced this remix of 'The Devil in the New Dress' from a video on YouTube, where the person who owned the remixed version of the instrumental had left a link in the description where we could download the music copyright free.

Another track we have decided to use is 'Funky Suspense', which is smooth backing music that the owner has described as 'inspired by 70s movies and TV shows'.
It is very typical of detective programs with a fun twist, such as BBC's Death in Paradise, which uses Reggae music as its predominant soundtrack.
This light hearted tone is perfect for the tone we would like to create in the opening sequence; it compliments the comedic moments with these teenage characters very well, and highlights how few of them take the investigation seriously during the equilibrium period of this film. It also helps deliver more shock to the audience when the mood of the action suddenly changes as the bombshell is revealed.
We sourced 'Funky Suspense' from the website BenSound.com, where the track is free for us to download and use in our film opening as long as we credited the owner.

We chose this music for our soundtrack because we wanted to pay homage to the typical, neo-noir soundtracks that usually include a jazz score, films like Chinatown.
'The Devil in the New Dress' has a similar smooth tone to jazz, which will set a familiar tone for people who are fans of crime dramas, only it is a new song for a modern age. It is also a remix of the song by Kanye West, a music icon amongst young adult audiences, so the music choice will not alienate our target audience.
The music will be diegetic at the beginning of the sequence as it plays over the opening credits, but when it is revealed that it is Raj playing the song through his headphones, we will switch the music to diegetic, with the sound perspective coming from behind Raj, where the camera is. Thus, we will make the song sound quieter and tinny to make the sound perspective appear realistic. Such a technique is used in The Amazing Spider-Man 2.
The music will come back in at the end as the movie's title card appears to create a sudden contrast with the silence that occurs after Peter's murder has been revealed, allowing the audience to relieve their tension and continue with the film.
We sourced this remix of 'The Devil in the New Dress' from a video on YouTube, where the person who owned the remixed version of the instrumental had left a link in the description where we could download the music copyright free.

Another track we have decided to use is 'Funky Suspense', which is smooth backing music that the owner has described as 'inspired by 70s movies and TV shows'.
It is very typical of detective programs with a fun twist, such as BBC's Death in Paradise, which uses Reggae music as its predominant soundtrack.
This light hearted tone is perfect for the tone we would like to create in the opening sequence; it compliments the comedic moments with these teenage characters very well, and highlights how few of them take the investigation seriously during the equilibrium period of this film. It also helps deliver more shock to the audience when the mood of the action suddenly changes as the bombshell is revealed.
We sourced 'Funky Suspense' from the website BenSound.com, where the track is free for us to download and use in our film opening as long as we credited the owner.

Sound effects will be important to our opening sequence, as they need to be loud and detailed to raise the intensity of the action in the scene. The sound effects we will need are a door opening and closing, the sound of the document being slid across the table and a chair scraping against the floor. We can record separately these sound effects separately in post to make them louder and more detailed than if we filmed them on location.
Sound effects can play a big part in intensifying the on-screen action, such as in the interrogation scene of the Matrix where the sound effects are incredibly detailed to make the various 'clicks' and 'buzzes' in the scene feel as tangible and dangerous as possible, particularly when paired with silence like we intend to do for some portions of our opening sequence.
R+P Post 8: The credits in our opening sequence
Our film opening begins with the logos for our production and distribution companies, Film 4 and Screen Gems, which will play in silence.
This will be followed by white, lower case text on a black screen which will read 'a film 4 and screen gems production'. This style of text will give the unique, subtle tone of an independent film.
The same text and font will appear for the rest of the credits, which will appear superimposed over the close ups of the five teenagers. This is an homage to the extensive credits sequences that occur in older neo-noir films, which credit a long list of people in their opening sequence. An example of this is the opening credits for The Usual Suspects, which have white text superimposed on footage of rippling water.

In order to keep the story interesting for the opening sequence, however, we have decided to place these credits over footage with more detail relevant to establishing the setting of the interrogation room and the characters, in order to keep our teenage audiences intrigued and invested in the film.
The superimposed credits that will appear are (in order of appearance):
This will be followed by white, lower case text on a black screen which will read 'a film 4 and screen gems production'. This style of text will give the unique, subtle tone of an independent film.
The same text and font will appear for the rest of the credits, which will appear superimposed over the close ups of the five teenagers. This is an homage to the extensive credits sequences that occur in older neo-noir films, which credit a long list of people in their opening sequence. An example of this is the opening credits for The Usual Suspects, which have white text superimposed on footage of rippling water.

In order to keep the story interesting for the opening sequence, however, we have decided to place these credits over footage with more detail relevant to establishing the setting of the interrogation room and the characters, in order to keep our teenage audiences intrigued and invested in the film.
The superimposed credits that will appear are (in order of appearance):
- 'directed by r.r. banks'
- 'produced by jack edmondson'
- 'screenplay by mary pan'
- 'cinematographer sayo aloje'
- 'music by emilio francischelli'
The action of the opening sequence will now occur. After the bombshell hits about Peter Smith being found murdered, and Raj is set up to be the first one to be questioned, the title card for the movie will be shown, appearing as 'what happened to peter smith?' on a black screen with the same white font.
R+P Post 7: Our opening sequence's planned mise-en-scene
The set-up for our opening sequence is relatively simple: the room is an interrogation room, which in is displayed traditionally as a dimly lit, empty room, containing only a few pieces of set, such as a table and chairs. One such interrogation room that adheres to this image is seen in The Dark Knight.
We will also use a bulb that will hang on a wire from the ceiling, which we will use as our sole light source. The use of high angle lighting is seen in many interrogation scenes to create high-contrast between the key-lit areas of characters and the areas that are left in shadow; this will create a sense of each character's, including the detective's, moral ambiguity. The use of lighting in this way is called the Chiaroscuro effect, which is demonstrated in the opening scene of The Usual Suspects.
We will use our camera to create certain effects; for example, we will keep the framing of characters tight, and use multiple close-ups in order to achieve a claustrophobic tension to the scene, similar to the interrogation scene in Now You See Me.
We chose to add props that will compliment the feel of an authentic interrogation room; this involves an official folder that will contain a plastic-covered picture of Peter, which is an item seen in a lot of crime dramas, such as in the BBC drama Luther.

We will also use props that carry the plot of the opening sequence; a mobile phone and earphones that Raj will use to listen to music, and a box of tissues to use when Cherish starts to cry.
Costumes will be our biggest piece of mine-en-scene, because they will be the biggest first impressions the audience get for these characters. This is incredibly typical of traditional neo-noir crime dramas, where the appearance of each suspect would say a great deal about their social status and their personality, which the film will either conform to or challenge; this can be seen evidently in the line-up near the end of The Usual Suspects.

For instance, Tyrone will wear a dark hoodie in the opening sequence to conform him to a general negative class stereotype that labels young males of lower class as gang members, who are represented as wearing hoodies in many forms of media. This is a representation that will be challenged later in the film.
Our interrogation room will contain a blank, white table and two clinical chairs.
We will use our camera to create certain effects; for example, we will keep the framing of characters tight, and use multiple close-ups in order to achieve a claustrophobic tension to the scene, similar to the interrogation scene in Now You See Me.
We chose to add props that will compliment the feel of an authentic interrogation room; this involves an official folder that will contain a plastic-covered picture of Peter, which is an item seen in a lot of crime dramas, such as in the BBC drama Luther.

We will also use props that carry the plot of the opening sequence; a mobile phone and earphones that Raj will use to listen to music, and a box of tissues to use when Cherish starts to cry.
Costumes will be our biggest piece of mine-en-scene, because they will be the biggest first impressions the audience get for these characters. This is incredibly typical of traditional neo-noir crime dramas, where the appearance of each suspect would say a great deal about their social status and their personality, which the film will either conform to or challenge; this can be seen evidently in the line-up near the end of The Usual Suspects.

For instance, Tyrone will wear a dark hoodie in the opening sequence to conform him to a general negative class stereotype that labels young males of lower class as gang members, who are represented as wearing hoodies in many forms of media. This is a representation that will be challenged later in the film.
R+P Post 6: Our opening sequence's characters and how we plan to represent social groups
We have a large number of characters in our opening sequence, each with their own personalities and identities, and all with different relationships to the murdered Peter Smith. They were the last people to see Peter before he died, as that night they were all at the same party.
Our representation focus is teenagers, and we wanted to represent the many social groups that make up this social group. This includes representing young people of different ethnicities, genders and classes.We thought that this would positively represent youth groups as it is a truthful representation of the diversity seen in modern youth groups.
Rajesh Singh:
DC Sean Mann:
Our representation focus is teenagers, and we wanted to represent the many social groups that make up this social group. This includes representing young people of different ethnicities, genders and classes.We thought that this would positively represent youth groups as it is a truthful representation of the diversity seen in modern youth groups.
Rajesh Singh:
- A cheeky, Asian nerd who makes humorous remarks about the ineptitude/ laziness of the detective, making it clear that he thinks he knows better.
- Relationship with Peter Smith: he is Peter's best friend - he doesn't think seriously of Peter's disappearance until the end of the sequence, when he finds out he is dead.
- Inspirations for how he want to represent this character include Data from The Goonies.
 |
| Data is a highly intelligent young boy whose inventions, made from junk, help get the Goonies out of some sticky situations. We wanted to use this stereotype in our representation of Raj that Asian characters are typically very clever, but we also wanted to challenge that by also making Raj very cheeky and laddish; where Data was very agitated at what the adults would think of their actions, Raj openly critiques the detective using his intelligence. |
- An apathetic, professional detective who bitterly dislikes the attitude he is shown by the teenagers. His job is hanging on a thread after previous failures as a detective.
- Relationship with Peter Smith: he is investigating Peter's disappearance/murder.
- Inspirations for how he want to represent this character include Alec Hardy from the BBC series Broadchurch, and Jim Hooper from the Netflix series Stranger Things.
 |
| Alec Hardy is one of two detectives we follow in Broadchurch; he does not let his emotions show that easily, and his interactions with others are, for the most part, strictly professional and cold. We wanted to represent DC Sean Mann similarly in behaviour and appearance (e.g. his scruffy hair and his costume). Alec Hardy has a reputation as a failing detective, which is a character point we used for the portrayal of our detective. |
In the video above, Hooper talks very sternly to the three children in order to try and get proper meaningful answers out of them, and appears overtly frustrated and tired with their petty squabbles. We wanted to replicate this older detective-younger suspect relationship in our representation our detective and his relationships with the teenagers he interviews.
Cherish Beauguarde:
- A young woman with an 'ego' aesthetic, but who is deeply empathetic and emotional.
- Relationship with Peter Smith: she is Peter's boyfriend, and shows genuine distress about his disappearance.
- Inspirations for how he want to represent this character include Tina Cohen-Chang from the Fox series Glee.
 |
| Tina Cohen-Chang is played by South-Korean born American actress Jenna Ushkowitz, who begins the first series wearing dark, edgy clothes and black eye makeup, and also has a variety of genuinely heartfelt relationships. We thought that the 'emo' aesthetic was commonly represented with white people, and with very little empathy or three-dimensionality. We thought it was interesting to challenge that representation by, similarly to Glee, casting a non-white actress to play Cherish and have her be in a close relationship. |
Lucy Patterson:
- A gossipy, judgemental young woman that is eager to know everything about the case to tell her friends
- Relationship with Peter Smith: she didn't know him well, but still finds him annoying. It was the place and time of her party where Peter was murder.
- Inspirations for how he want to represent this character include Regina George from Mean Girls.
 |
| Regina George is a privileged, bitchy and manipulative character in the film Mean Girls. We wanted Lucy to replicate this behaviour by being mean and gossipy, but we noticed that these character traits in college age girls were typically represented by white actresses, and we decided to challenge this representation by casting a non-white actress to play Lucy. |
Tyrone Beckham:
- A black, working class young man; he is misunderstood as being lone, mean and intimidating, but is shown later in the film to have qualities of loyalty and empathy.
- Relationship with Peter Smith: he does not like Peter, and it is hinted that he bullied him at school.
- Inspirations for how he want to represent this character include Moses from Attack the Block.
 |
| Moses is a young, black man who is first shown to be an intimidating thug, but is later developed to be a loyal and brave member of the group. We wanted Tyrone to represent the young black male social group in a similar way, first by establishing the negative stereotype of an anti-social bully in our opening sequence, but fleshing him out to have more positive qualities later in the film. |
Simon Smith
- A chilled out young man who is not worried or bothered about the police proceedings.
- Relationship with Peter Smith: he is Peter's older brother, and it is clear they do not have a close relationship, as Simon doesn't seem to care that Peter has disappeared, saying 'he keeps making himself a target'.
- Inspirations for how he want to represent this character include Rodrick from Diary of a Wimpy Kid.
 |
| Rodrick is a bully to his younger brother Greg, is lazy and wears lounge clothes a lot of the time. Besides the rock aesthetic given to Rodrick (e.g. the black eyeliner), we wanted to replicate his laid back characteristics in the character of Simon, leading to a slightly negative portrayal of fraternal relationships. |
R+P Post 5: Our opening sequence idea
The story of our opening sequence takes place in the interrogation room of a police department. We chose the scenario of an interrogation because it is an immediately identifiable feature of crime dramas and one that would immediately invest the audience into the genre. The Usual Suspects is a traditional neo-noir crime film that has an interrogation scene.
Five teenagers are questioned by a detective about a schoolboy, Peter Smith, who disappeared two nights ago after leaving a house party where the teenagers where. They are asked by the detective about what their relationship with Peter was like; most of the teenagers, besides his girlfriend, are not too worried about Peter's whereabouts and express their dislike for him. An officer interrupts one of the questioning's to whisper something to the detective. The detective reveals that Peter's body has been found and the teenagers are all there for further questioning.
It will begin with close ups of all the teenagers and the detective, showing them tapping the table and blinking nervously. Close ups are used to great effect to establish a character's mood in one episode of the TV series Black Mirror called Hated in the Nation.
The main body of the opening sequence shows the questioning of the five teenagers. This is done by inter-cutting the police interviews so that the multiple conversations are edited in such a way that they seem like one flowing conversation. This technique is used in one episode of the TV musical show Glee.
The conversations will include editing techniques such as shot/reverse shot, to make the conversations between the detective and the teenagers flow naturally. We will also use sound bridges and blend shots together using fades to make the inter-cuts appear as if they were one conversation.
Here is a page of our script for the opening sequence:

We will use the age difference between the detective and the children to create binary opposites, as well as the formally dressed detective conflicting with the informally dressed teenagers including long shots taken from the side of the table to show both characters in profile and therefore creating a visual comparison between the two.
It will begin with close ups of all the teenagers and the detective, showing them tapping the table and blinking nervously. Close ups are used to great effect to establish a character's mood in one episode of the TV series Black Mirror called Hated in the Nation.
 |
| The close up accentuates Karin's pained expression as she faces the inquest |
The conversations will include editing techniques such as shot/reverse shot, to make the conversations between the detective and the teenagers flow naturally. We will also use sound bridges and blend shots together using fades to make the inter-cuts appear as if they were one conversation.
Here is a page of our script for the opening sequence:

We will use the age difference between the detective and the children to create binary opposites, as well as the formally dressed detective conflicting with the informally dressed teenagers including long shots taken from the side of the table to show both characters in profile and therefore creating a visual comparison between the two.
R+P Post 4: Our film's genre, title and plot outline
Our film is a mystery drama with the title of 'What Happened to Peter Smith?' The title was chosen for its homage to some mystery and thriller films that have questions for titles, such as Whatever Happened to Baby Jane?

Our film is told from the perspectives of five teenagers, all of whom are being questioned by a police detective about the murder of a boy from their school, Peter Smith. The film is framed by the interrogations of these children, which all take place in the interrogation room of the police department. The stories of these characters are told through flashbacks, as they recount their experiences of the night where Peter went missing, which was two nights ago at a house party of one of the teenagers.
Equilibrium: The teenagers are brought in for questioning, at first believing that the case is merely to find the whereabouts of fellow student Peter Smith.
Disruption: It is revealed very early on that Peter's body has been found and it turns into a murder case, with all teenagers being kept in the interrogation room for further questioning. The detective's job is also revealed to be hanging on the successful resolution of this case.
Attempt at resolution: The detective tries to garner evidence towards finding Peter's killer through the alibis of the five teenagers, where we discover, through the flashbacks, that all the teens have had some motive to kill Peter. An attempt of a resolution is made when detective discovers one piece of evidence that appears foolproof, but it turns out to be a dead lead.
Resolution: The detective finds himself unable to find the killer, and, fearing he might lose his job, he puts the blame on Tyrone, who bullied Peter. The killer is not revealed, and the film ends on the unsettling idea that the real criminal escaped scott-free.
Our film is told from the perspectives of five teenagers, all of whom are being questioned by a police detective about the murder of a boy from their school, Peter Smith. The film is framed by the interrogations of these children, which all take place in the interrogation room of the police department. The stories of these characters are told through flashbacks, as they recount their experiences of the night where Peter went missing, which was two nights ago at a house party of one of the teenagers.
Equilibrium: The teenagers are brought in for questioning, at first believing that the case is merely to find the whereabouts of fellow student Peter Smith.
Disruption: It is revealed very early on that Peter's body has been found and it turns into a murder case, with all teenagers being kept in the interrogation room for further questioning. The detective's job is also revealed to be hanging on the successful resolution of this case.
Attempt at resolution: The detective tries to garner evidence towards finding Peter's killer through the alibis of the five teenagers, where we discover, through the flashbacks, that all the teens have had some motive to kill Peter. An attempt of a resolution is made when detective discovers one piece of evidence that appears foolproof, but it turns out to be a dead lead.
Resolution: The detective finds himself unable to find the killer, and, fearing he might lose his job, he puts the blame on Tyrone, who bullied Peter. The killer is not revealed, and the film ends on the unsettling idea that the real criminal escaped scott-free.
R+P Post 3: Our production and distribution institutions
We approached this brief as if from the perspective of a real production and distribution company. This meant that all of the decisions we made during research and development were influenced by the characteristics of those companies.
For our distribution company, we chose Film 4 Productions.

Film 4 Productions is a British independent film company. It is famous for producing, distributing and backing a large number of films, most of which have a dark, gritty tone and a 'kitchen sink' style, meaning they take place on a smaller scale and focus on people's domestic lives, such as at home or in the pub. An example of a Film 4 kitchen sink drama is the 1991 film Riff-Raff directed by Ken Loach.

We decided that because our film has a relatively closeted feel to it, as it is framed by the police-interrogations which take place in one room, it would fit in within Film 4's filmography. Furthermore, Film 4 has been associated with films that have targeted both young adult audiences, such as The Inbetweeners Movie, and fans of crime drama, such as In Bruges.


For our production company, we chose Screen Gems.

Screen Gems is a studio production and distribution subsidiary company of Sony. Similar to companies like Fox Searchlight. Although they are famous for their co-production and distribution of horror movies, Screen Gems have released independent films that are a variety of genres. They have also co-operated with a Film 4 Production before with Attack the Block, another young adult film with a main cast of teenagers.

As our film is an independent film, it would most likely be necessary to receive help from the BFI for funding. Films that include some 'British flavour', for example British directors and actors, often receive tax relief or grants to make production of their film cheaper; schemes like this include the BFI British Cultural Test, which can offer 25% of qualifying film expenditure to films that have enough British actors, directors and locations to achieve 18/35 on their test. This money is sourced by the BFI from the National Lottery Fund, which would then be distributed to our film for financing.

For our distribution company, we chose Film 4 Productions.

Film 4 Productions is a British independent film company. It is famous for producing, distributing and backing a large number of films, most of which have a dark, gritty tone and a 'kitchen sink' style, meaning they take place on a smaller scale and focus on people's domestic lives, such as at home or in the pub. An example of a Film 4 kitchen sink drama is the 1991 film Riff-Raff directed by Ken Loach.

We decided that because our film has a relatively closeted feel to it, as it is framed by the police-interrogations which take place in one room, it would fit in within Film 4's filmography. Furthermore, Film 4 has been associated with films that have targeted both young adult audiences, such as The Inbetweeners Movie, and fans of crime drama, such as In Bruges.


Screen Gems is a studio production and distribution subsidiary company of Sony. Similar to companies like Fox Searchlight. Although they are famous for their co-production and distribution of horror movies, Screen Gems have released independent films that are a variety of genres. They have also co-operated with a Film 4 Production before with Attack the Block, another young adult film with a main cast of teenagers.

As our film is an independent film, it would most likely be necessary to receive help from the BFI for funding. Films that include some 'British flavour', for example British directors and actors, often receive tax relief or grants to make production of their film cheaper; schemes like this include the BFI British Cultural Test, which can offer 25% of qualifying film expenditure to films that have enough British actors, directors and locations to achieve 18/35 on their test. This money is sourced by the BFI from the National Lottery Fund, which would then be distributed to our film for financing.

R+P Post 2: Our target audience and how we plan to attract/address them
Given the genre of our film, our chosen target audience is for fans of crime/mystery dramas, skewed towards British fans audiences and young adults aged 15-25. We noticed that crime dramas have the potential to be very popular with fans; for instance, the BBC crime drama series Sherlock, which is a show that is heavily discussed and liked by students at our secondary school, as well as trending consistently on Twitter when it airs.


Because we chose Film 4 as our production company, which is an independent, British production house, we decided that the film should also be targeted towards British audiences.
To skew our film to our chosen target audience:


Because we chose Film 4 as our production company, which is an independent, British production house, we decided that the film should also be targeted towards British audiences.
To skew our film to our chosen target audience:
- We will use young, British adult actors from our year group (ages 16-17)
- We will have the actors depict a group of teenage protagonists
- We will have identifiable tropes of crime dramas

Subscribe to:
Posts (Atom)