On reflection, I think that the pre-production process has been extremely helpful and, from what we have learned from it, I am confident that we are in a good place now that we are approaching the main shoot. We became aware of a number of problems with our initial idea that we would not have spotted had we not performed our test shoot, and have since come up with many ways of working around them. We were also able to find out which of our shots and other ideas worked really well and now know what we will keep in our main shoot.
We have worked very well as a group and have each contributed much to this project, putting in a lot of our own time outside of scheduled 'shooting time' into making sure that we are prepared as we can be for the main shoot and it will look as good as possible.
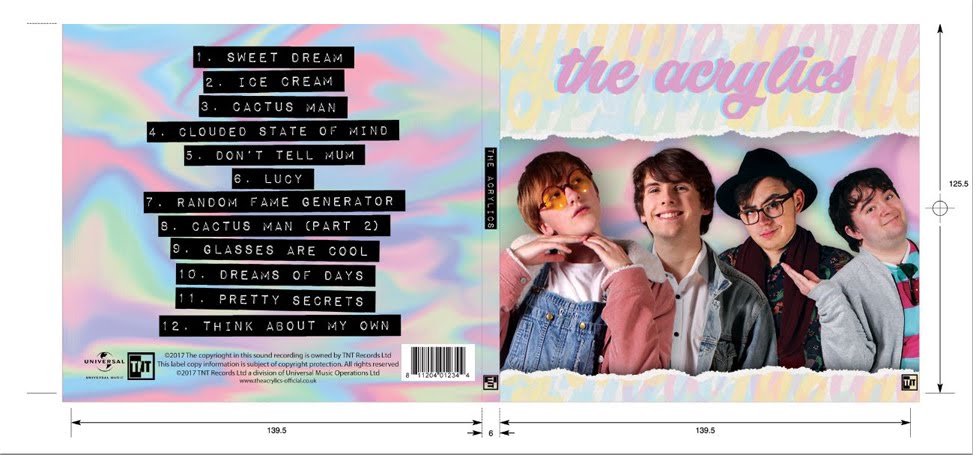
Here is the outside panel of my digipak album cover.
Here is the inside panel of my digipak album cover.

Here is a link to my artist's website. Please click on the image below to enter the website.

Monday, 6 February 2017
R+P Post 19: Our rough cut
We found that some of our ideas worked really well once we'd finished our rough cut. The pace in the middle of the opening was quick and that made the intercuts between the characters interesting and dynamic.
We also liked how the music complimented the scene, particularly when our idea to have the music turn from non-diegetic to diegetic worked successfully. This happens when the character Raj is shown to be playing music through his earphones, and when this is shown, we cut the music from a downloaded 'clean' track to one that we had recorded earlier through a microphone that had a tinny quality to it. This effectively made it seem as if the music was now coming from Raj's headphones and not just a part of the soundtrack.
Our group, with the help of feedback from our teachers, also agreed on a few changes that we could make. Because we couldn't achieve the arc we wanted when we were filming, we had to try and edit the tilt we had filmed to the best of our ability. However, the cut felt like a jump cut and the change of characters at that moment was not as effective as it could've been. We agreed that the speed at which the camera panned from the detective to the teenagers at that point could be increased to achieve a more dynamic effect. We also thought we could add a shot-reverse shot somewhere in this sequence to make the pan less tiresome.
We also agreed on a few other points:
- cut to more reaction shots (e.g. when the detective passes over the clipboard, add a shot of the detective's face)
- cut quicker on some shots (e.g. when Cherish says 'Please')
R+P Post 18: Our test shoot
Our group definitely wanted to do a test shoot before we did a main shoot for our film opening, because we decided that if any problems with what we had planned, the test shoot would reveal them, giving us time to improve upon our final idea before we did our main shoot.
Our media teacher suggested that we could shoot the whole of each conversation between the detective and the teens in a master shot. We decided that this would be a good idea, because it would mean that if a certain shot did not turn out as planned, we would have the master shot as a backup. It also allowed the actors to rehearse their lines and get a grasp of their characters and their situation in the scene.


We received feedback from our group discussions and from our teachers, and have decided upon a list of things to improve for our main shoot:
In preparation for the test shoot, we created a shoot board. We were provided with a template in which we could complete the shoot board, and we decided that it would be beneficial for us to use it. The template broke down each shot into the time, the shot number, the date and location, the action and dialogue, the actors involved and the roles of the crew, also including columns for the number of takes and the best take (to be filled in on the test shoot day). We found this template would be very useful because it condensed several documents worth of information on one easy to follow table.
We decided to split the workload between us to create the shoot board, each of us taking about four pages each. It was decided that we would organise the shoot board based on character; because there are a lot of characters being interrogated during our opening, we thought that going through the shots character by character would help save time, what with the character's never leaving their position at the table, rather than switch out characters and doing it purely by the camera set up. Also, because we had four external actors outside of our media group, we decided to put their scenes first so that they didn't have to wait as long to leave.
 |
| Page 3 of our Test Shoot Board |
Once we'd decided on the order we wanted to film the shots, it was simply then a matter of filling in the rest of the table. For the action/dialogue column, we decided it would be better to have visual evidence, so we took photos of the shots from our storyboard to provide an image of the shot we wanted. This benefited us because having a large number of characters meant that we had a number of actors outside of our media group who weren't as familiar with the action of our film opening, and it was easier for them to see what they needed to do rather than read it.


We also made sure that we organised who was on camera or directing for each shot. This was useful for two reasons: for one, it meant that we saved time exchanging roles on the shoot day, and secondly, it meant we shared out the workload of being on camera etc. For instance, I managed to get a good chance filming by being scheduled to shoot a lot of the close ups, as my role in the opening meant I was rarely not acting.

Me on camera duty
The test shoot went well and we had a lot of good things come from it. The actors got to grips with their characters very well and even though we have decided to change round some of the actor's roles to fit their characters better, everyone involved now has a good idea of the story. The lighting was good for the most part, save for one shot which required a bit more light exposure.

The test shoot helped us discover what needed improving for the main shoot. We discovered a few flaws with our shoot board; we discovered that a lot of time could be saved by rearranging the order that we took shots if there was the same camera set up. For instance, the quick cuts between Tyrone, Lucy and Raj in the latter half of our opening could have been filmed consecutively, as it would look better to keep the camera in the same set up for these shots.
As we had scheduled for these shots to be done at different times, the set ups do not look consistent, predominantly in light exposure
Also, we discovered that some of the equipment we hired for the shoot did not work as we would've hoped. We received a dolly so that we could make smooth pans and arcs, but unfortunately, the floor of the garage where we were filming was too bumpy to make the pan smooth - the wheels snagged sometimes and made a loud noise as it rolled across the floor, which distracted from the dialogue of the scene.
This was one shot where we planned to use the dolly. As you can see, the camera is very shaky and this was because to reduce the noise created by the dolly, we had to lift the camera a little, which gave it a very handheld look.
We have decided on an alternative to our arc for the main shoot, where we will try and use a pan instead with the camera grounded by a tripod.
Although this was largely improvisation, this is the new idea we had instead of using the revolve we had initially wanted using the dolly.
We received feedback from our group discussions and from our teachers, and have decided upon a list of things to improve for our main shoot:
- Switch the actors who play Cherish and Lucy
- Alter script so that Cherish has more screen time
- Fix the jump cut on the tilt when Tyrone changes with Simon with grading and closer editing to make it less noticeable
- Alter script to have more detective jargon (e.g. "murder
caseinquiry") - Make the detective more energetic, as if he is ready to start the case - frustrated, eager rather than bored, tired. Reflect this in his costume; give him a blazer and make him smarter by not rolling up his sleeves.
- Shorten Screen Gems indent
- Have music playing over studio indents
- Add lighting on foot shot
- Give the audio recorder more of a function in the scene
- Improve the quality of the zoom in on the detective at the end
On the test shoot day, we worked efficiently to finish filming by the wrap time we had arranged for ourselves, and we ended up wrapping up on time at 4:30. All in all, I think we worked well together and managed to produce a decent product. Although our product is a lot longer than the two minutes stated in the brief, we are not going to cut anything for now, as we think it's better to go into the main shoot with too much footage rather than too little.
R+P Post 17: Our editing arrangements
As a group, we decided that a schedule would benefit our group when it came to editing our test shoot footage, because it when we used an editing schedule for our animatic, we were successful in organising our time efficiently so that we finished before the deadline.
Some of our editing time was as a group, whereas other times it was individually or in a pair. To keep each other updated of our progress when someone was absent, we would leave a note by our edit suite denoting what progress or changes we had made. This meant we could stay well co-ordinated and not make any changes that hadn't been recognised and agreed by the group as a whole.
 |
| Our editing schedule for the rough cut. |
R+P Post 16: Casting, costumes, hair and make-up
Because our characters are almost all young, college age students, we agreed that the best people to cast would be people from our peer group. We would need a total of 7 actors, so to prevent having too many people give up their free time to come to our shoot days, each member of our group decided to take an acting role, therefore keeping the number of actors other than us to a minimum. We kept diversity in mind when casting, as we wanted to represent many different identities from the teenage social group. Therefore, we cast people of a variety of different ethnicities and gender identities.
Here was the original cast:
'Raj Singh' - Shathushan Somasundaram
'DC Sean Mann' - Jack Edmondson
'Cherish Beauguarde' - Tiwa Antwi
'Lucy Patterson' - Mari Hamano
'Tyrone Beckham' - Sayo Ajoje
'Simon Smith' - Emilio Francischelli
'Officer' - Ekincan Kaya
'DC Sean Mann' - Jack Edmondson
'Cherish Beauguarde' - Tiwa Antwi
'Lucy Patterson' - Mari Hamano
'Tyrone Beckham' - Sayo Ajoje
'Simon Smith' - Emilio Francischelli
'Officer' - Ekincan Kaya
Here was the casting, costume, and hair and makeup document we made in advance of the test shoot. We created this document so we could inform our actors what costume to bring and how we wanted their hair and makeup to look. Please note that this document has been updated to show the finished look of our characters from the main shoot with the changes we made since the test shoot, including our swapping round of actors for Cherish and Lucy.


R+P Post 15: Our filming location, set design and props
One of our first decisions as a group after we decided on our plot was where it would be filmed. It was important to find a filming location that replicated the interrogation room appearance that has been seen throughout movies and television.

Our filming location had to be a small bare room, in which we could darken the lights to create an intense atmosphere for our actors. After discussion, Emilio offered his home's garage as a possible place to film and, after we all saw photos of the garage space, we agreed that it was a suitable location for us to film an interrogation scene.

We then decided to stage a recce, giving us a chance to view and dress the filming location in advance of the test shoot, and bring any props or set pieces to the filming location. Our group organised to do this on the Saturday before the weekend of our test shoot. I contributed a white table, which we agreed befitted the appearance of a clinical police station's interrogation room, and we were also lent a number of props from our media teacher, who gave us two grey, plastic chairs, a clock and an audio recorder, which we agreed would make the interviews more professional. Most notably, our media teacher lent us a lightbulb which we could suspend from the ceiling, which was another interrogation trope we decided would fit our opening very well.
Once all the set pieces and props were transported to our filming location, we dressed the set. We pushed the table against the wall, which was made of grey bricks, and suspended the lightbulb over the table. This meant that when the overhead lights were taken down, the lightbulb illuminated the set in an intense glow, which we all agreed made for a well achieved atmosphere.

The props we used included:


Our filming location: BEFORE
We then decided to stage a recce, giving us a chance to view and dress the filming location in advance of the test shoot, and bring any props or set pieces to the filming location. Our group organised to do this on the Saturday before the weekend of our test shoot. I contributed a white table, which we agreed befitted the appearance of a clinical police station's interrogation room, and we were also lent a number of props from our media teacher, who gave us two grey, plastic chairs, a clock and an audio recorder, which we agreed would make the interviews more professional. Most notably, our media teacher lent us a lightbulb which we could suspend from the ceiling, which was another interrogation trope we decided would fit our opening very well.
Once all the set pieces and props were transported to our filming location, we dressed the set. We pushed the table against the wall, which was made of grey bricks, and suspended the lightbulb over the table. This meant that when the overhead lights were taken down, the lightbulb illuminated the set in an intense glow, which we all agreed made for a well achieved atmosphere.

Our filming location: AFTER
The props we used included:
- A clipboard and a file - we created a profile of Peter Smith, the missing teenager, and attached a head shot of him to the top of the file; we took a photo of our fellow media student Tom Brown to create the head shot.

- A clock - we planned to have specific times for each of the characters, so for each of the interviews the clock will be at a different time. This signifies the non-linear narrative; the interviews are happening at different times. Lucy's interview is first as she is the first one to hear about Peter's murder.

- An audio recorder - a device that is a common piece of iconography for the interrogation room setting, as well as the mystery genre

- A packet of tissues, for Lucy and Cherish.
- A phone and earphones, for Raj.

Overall, the set we created successfully replicated the look of a police interrogation room and was ready for our test shoot.
R+P Post 14: Our filming arrangements
Our group did several things in order to be prepared for the shoot days.
First, we scheduled the dates when we would have our test, main and backup shoots, so that when we casted our actors, we could ensure they would be free for all three weekend shoots. We decided this fairly early on during pre-production, around the time of completing the storyboard.

A week before our test shoot, we agreed to bring all of the kit to our location so that we could stage our set well in advance and not waste time on the morning of the shoot creating the set. Emilio brought the kit home from school on the Friday evening, and on Saturday we brought other necessities, such as the white table, over to the location ready for filming.
We then filled out a shoot organisation form, which described all the arrangements for the test shoot. This included the call times for our group and the actors, the location where we will be filming, the time we would be wrapping up filming, the names of all the additional actors and the signing off of any further kit arrangements.

A message I sent to my friend Mari, who played Lucy in our film opening
A week before our test shoot, we agreed to bring all of the kit to our location so that we could stage our set well in advance and not waste time on the morning of the shoot creating the set. Emilio brought the kit home from school on the Friday evening, and on Saturday we brought other necessities, such as the white table, over to the location ready for filming.
We then filled out a shoot organisation form, which described all the arrangements for the test shoot. This included the call times for our group and the actors, the location where we will be filming, the time we would be wrapping up filming, the names of all the additional actors and the signing off of any further kit arrangements.
 |
| Our test shoot organisation form |
Subscribe to:
Posts (Atom)